Introduction
Hello 👋
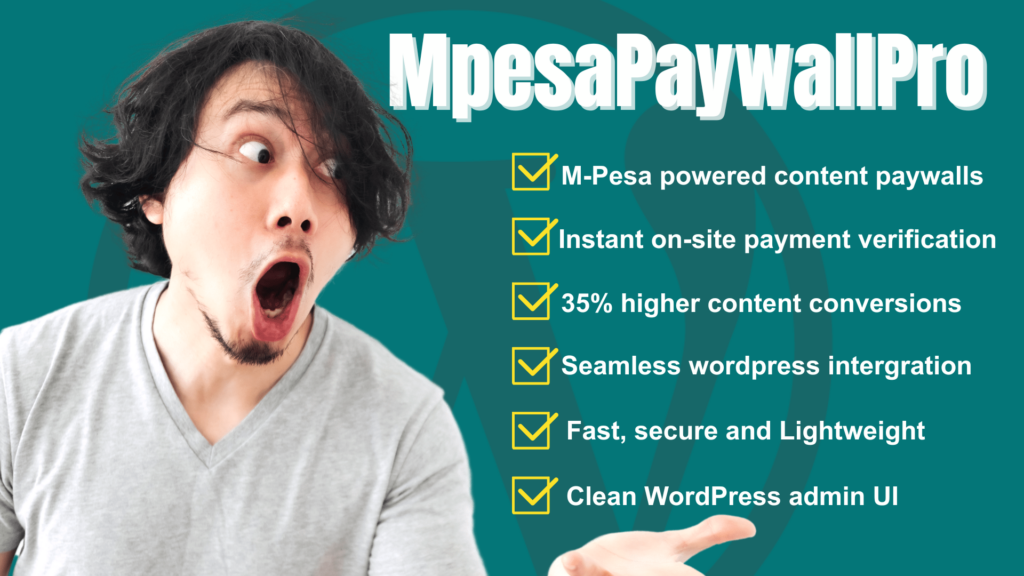
Thank you for choosing MpesaPaywallPro!
This is a powerful WordPress plugin that helps users like you—and hundreds more around the country—monetize their premium articles behind a paywall.
Haven’t purchased it yet?
No worries, send me a message on WhatsApp here.
This guide will walk you through every step, helping you get set up and start accepting payments as quickly as possible. By the end of this tutorial, you will have a fully functional paywall system accepting M-PESA payments on your WordPress website.
Sounds amazing, right?
Let’s dive in.
Prerequisites
Before we begin, let’s ensure you have the following installed:
- WordPress version 6.2.1 or higher (this Plugin is incompatible with other versions).
- PHP version 7.4 or higher. If you are using cPanel, here is a tutorial on how to check and upgrade your version.
- Mpesa Paybill number and Daraja credentials: Consumer key, Consumer secret, Passkey, and shortcode.
- Access to your WordPress admin dashboard.
If you have these prerequisites installed and working fine, you can proceed with this tutorial.
Installing and using the Plugin
After purchasing MpesaPaywallPro, you’ll receive a ZIP file named something like MpesaPaywallPro.zip. Save the file to a location on your computer where you can easily find it, such as your Downloads folder or Desktop.
To access your WordPress dashboard, open your web browser and navigate to your website’s login page. You can find this page by adding “/wp-admin” to the end of your website’s URL, for example,
www.yoursite.com/wp-adminThen, log in using your administrator username and password.
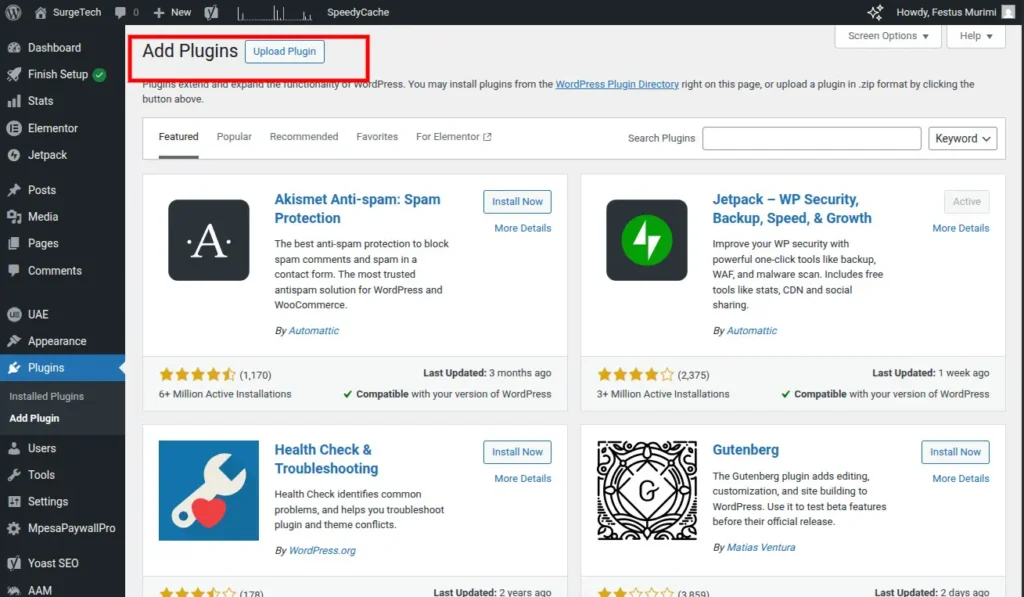
After logging into your dashboard, navigate to the left sidebar and click “Plugins.”
In the top-left corner of your dashboard, you will see a “Upload Plugin” button; click it.
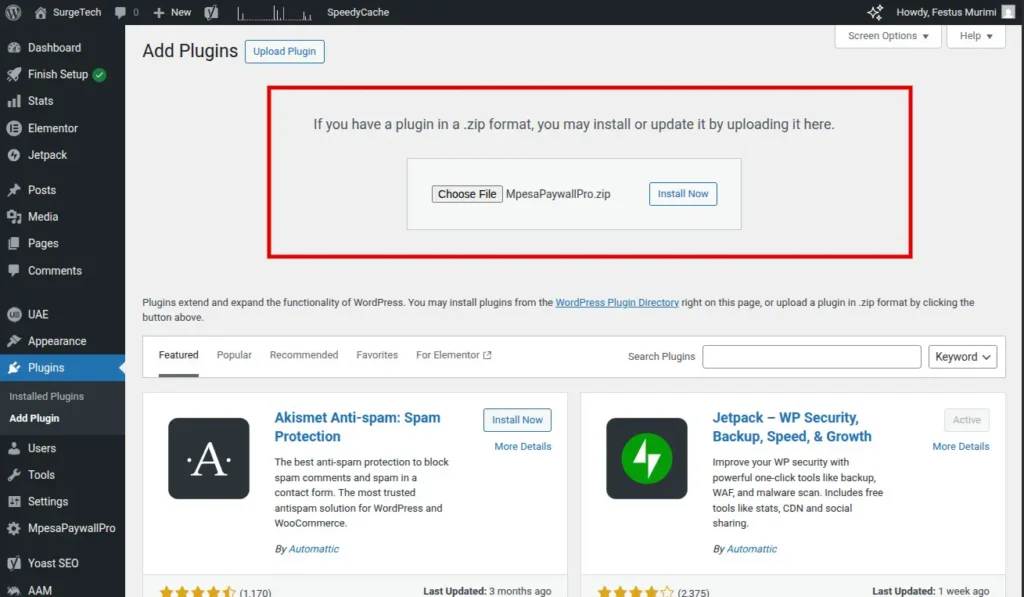
The page will change to show you a file upload interface. Click the “Choose File” button and locate the MpesaPaywallPro.zip file you downloaded. Select it, then click “Open”. Finally, click the “Install Now” button.
WordPress will now upload and install your Plugin. The plugin process may take a few moments, depending on your internet connection speed. Please do not close the page or navigate away until the installation is complete.
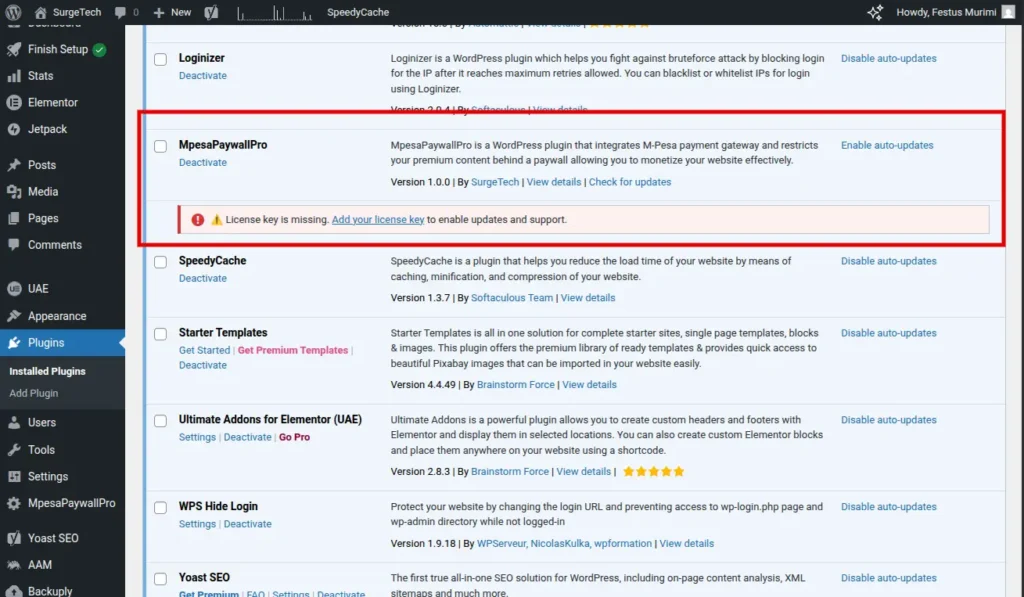
After installation, a success message will appear. Click the “Activate Plugin” button. This step is crucial; the Plugin will function until activated. Once activated, you will be redirected to your Installed Plugins page, where MpesaPaywallPro should be highlighted in blue, indicating it is active.
With the Plugin installed and activated, you can now connect it to your M-Pesa account.
In your WordPress dashboard sidebar, you’ll now see a new menu item called “MpesaPaywallPro“. Click on it. You’ll be taken to the Plugin’s Plugin’stings page, where you’ll see three tabs at the top: “M-Pesa Setup“, “Paywall Settings“, and “Access Control.“
You’ll see a welcome box appear, providing an overview of the Plugin’s Plugin’sality and helpful tips. Please take a moment to review this information. It explains that you can use either Sandbox (test) credentials for testing purposes or Live (Production) credentials to accept real payments.
Important: Do not grant access to these settings to any third party, employee, or individual you do not trust, as unauthorized access could result in financial loss.
Remember to click “Save Changes” before testing your API connection to ensure your settings are saved.
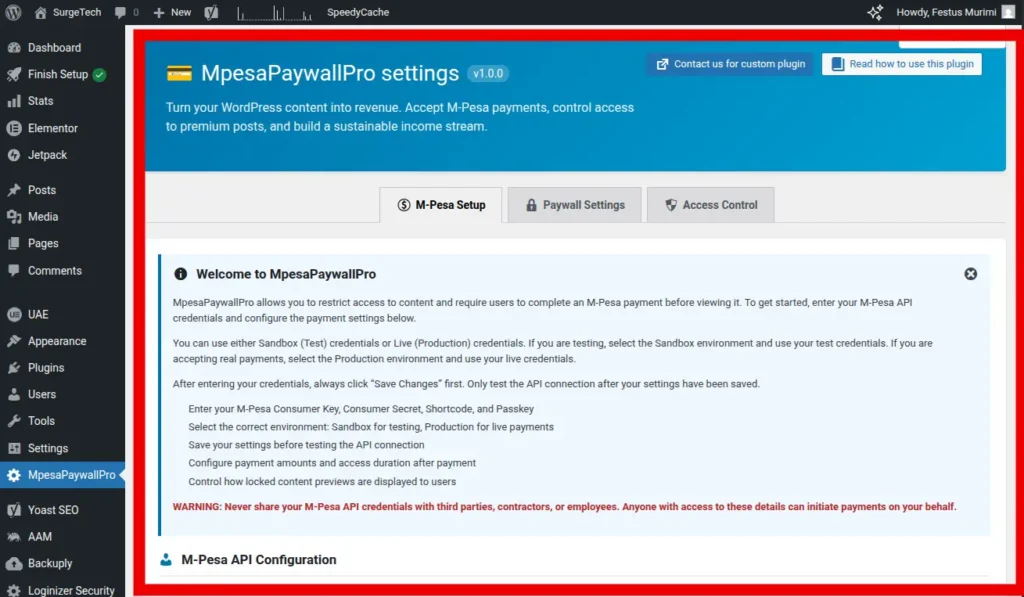
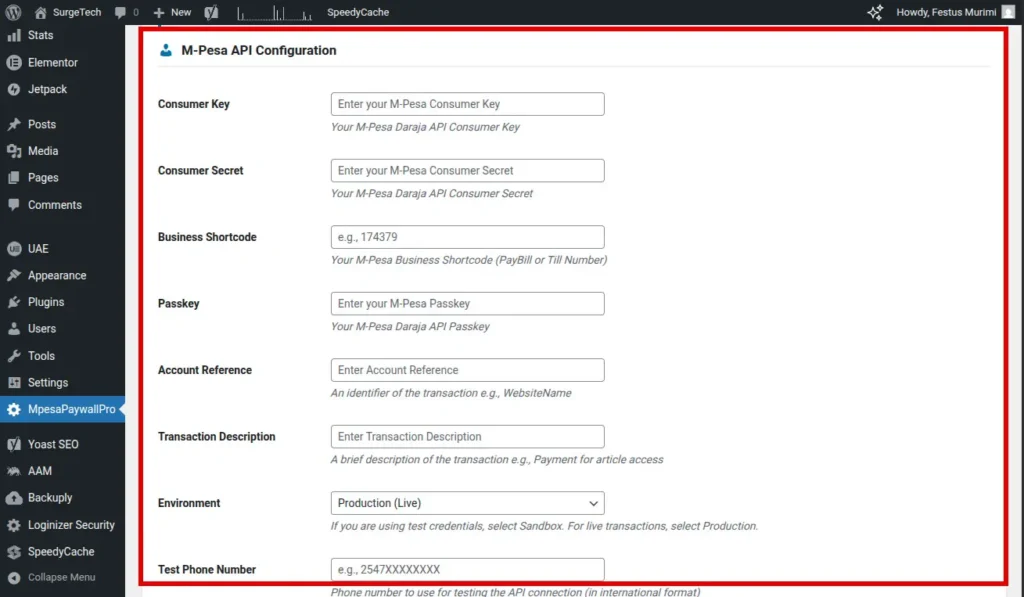
In the “M-Pesa Setup” tab, scroll down to the “M-Pesa API Configuration” section. You will need to complete the following fields:
- Consumer Key: Copy your M-Pesa Daraja API Consumer Key from the M-Pesa Daraja portal and paste it here.
- Consumer Secret: Copy your M-Pesa Daraja API Consumer Secret from the Daraja portal and paste it here.
- Business Shortcode: Enter your M-Pesa Business Shortcode, which is either your PayBill number or Till Number (e.g., “3055765“).
- Passkey: Copy and paste your M-Pesa Daraja API Passkey. This is typically a long string of characters, so ensure you paste it accurately.
- Account Reference: Provide an identifier for the transaction, such as your website name (e.g., “Surgetech-blog” or “MyWebsite”). Use a simple and easily recognizable reference.
- Transaction Description: Enter a brief description that will be displayed on the M-Pesa transaction (e.g., “payment for article access” or “Premium content subscription”).
- Environment: Select “Sandbox” from the dropdown menu if you are testing with test credentials. Choose “Production (Live)” when you are ready to accept real payments using your live credentials.
- Test Phone Number: Enter a phone number in international format (e.g., “25472512376) for testing the API connection. Use your own phone number to verify the test transaction.
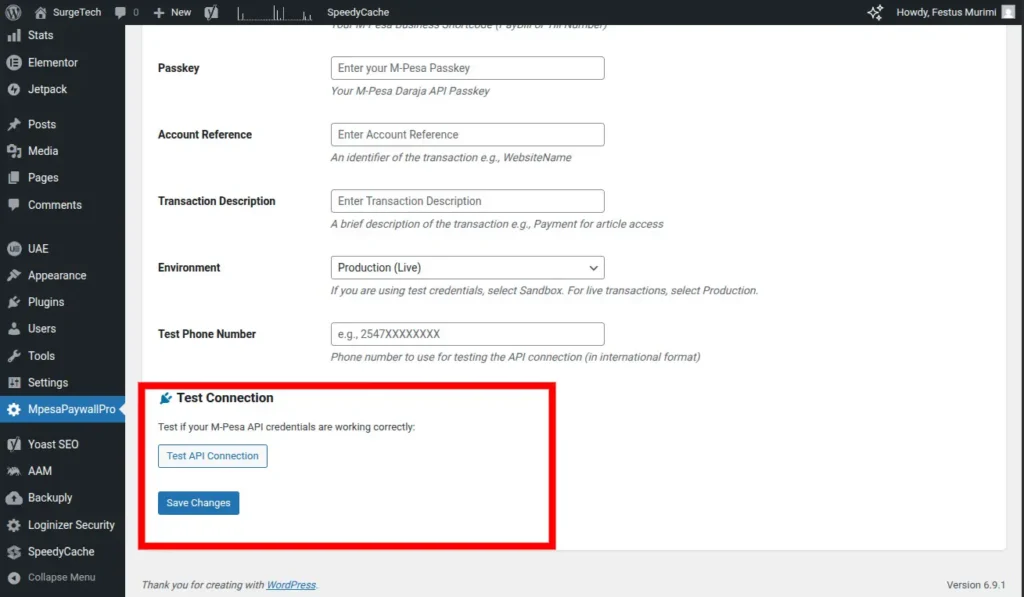
Once you have filled in all the required fields, scroll down and click the blue “Save Changes” button. Saving your changes is essential before proceeding.
After saving, click the “Test API Connection” button. Click this button to initiate a connection test to M-Pesa using the credentials you provided.
A success message will appear if the connection is successful. If an error occurs, verify your credentials and confirm that you have selected the correct environment (Sandbox or Production).
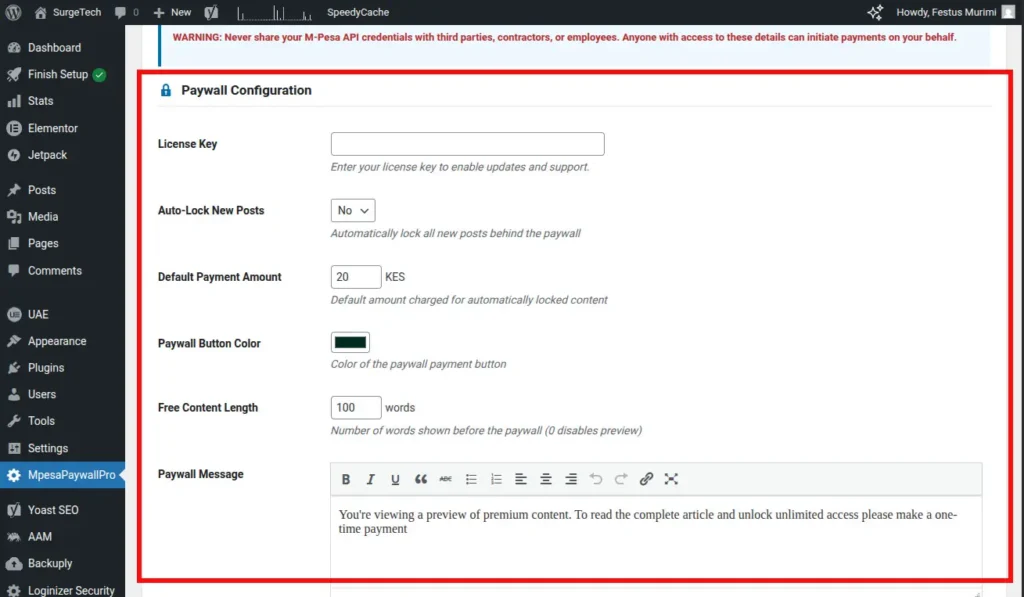
Now, let’s configure your paywall’s appearance and behavior. Navigate to the “Paywall Settings” tab at the top of the page.
Step 1: Enter Your License Key (Optional)
Locate the “License Key” field. If you have a license key from your purchase, enter it here to enable automatic updates and support. You can skip this step and add it later if you don’t have one yet.
Step 2: Configure Auto-Lock Settings
The “Auto-Lock New Posts” dropdown determines whether new posts are automatically paywalled.
- Select “Yes” to automatically lock all new posts by default.
- Select “No” to manually choose which posts to protect.
Most users prefer “No” for granular control.
Step 3: Set the Default Payment Amount
In the “Default Payment Amount” field, enter the price in Kenyan Shillings (KES) required to unlock content. The example shows “20” KES. Adjust this amount based on your content’s value and your target audience. Note that this is the default amount, and you can override it for individual posts.
Step 4: Customize the Paywall Button Color
Click the color picker box in the “Paywall Button Color” section to choose a color for your “Unlock Content” button. The default color is usually blue. Select a color that complements your website’s branding and is easily noticeable.
Step 5: Set Free Content Length
The “Free Content Length” field determines how many words visitors can read before the paywall appears. The example shows “100” words. This preview lets users sample your content before committing to a purchase. Setting this to “0” hides all content immediately. Increasing the word count (e.g., 200-300) provides a more generous preview.
Step 6: Customize the Paywall Message
The “Paywall Message” field contains the text displayed when content is locked. Use the toolbar buttons (bold, italic, lists, etc.) to format the message. The default message is: “You’re viewing a preview of premium content. To read the complete article and unlock unlimited access, please make a one-time payment.“
Customize this message to align with your brand voice. Consider highlighting the value of your content or adopting a friendlier, more inviting tone.
Step 7: Set Access Expiry Duration
In the “Access Expiry” field, enter the number of days until paid access expires. The example shows “30” days. After a user pays for an article, they’ll have access for 30 days before needing to pay again. Adjust this duration to suit your business model.
Step 8: Save Your Paywall Settings
Scroll down and click the blue “Save Changes” button to save your paywall configuration.

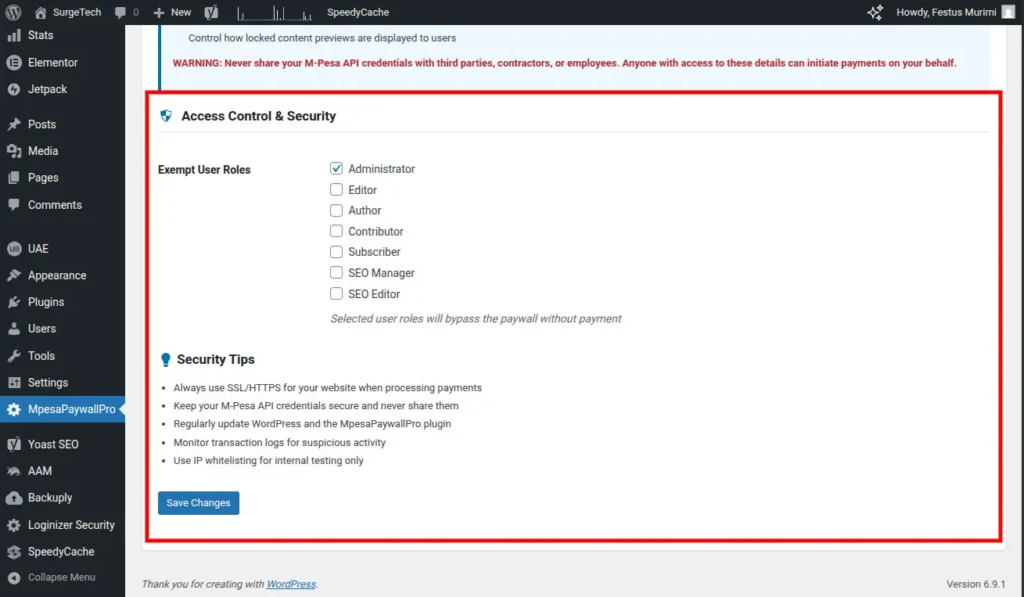
To manage paywall access for different user roles, follow these steps:
Step 1: Exempt User Roles
Navigate to the “Access Control” tab at the top of the page. You’ll see a list of WordPress user roles, such as:
- Administrator (usually checked by default)
- Editor
- Author
- Contributor
- Subscriber
Select the checkboxes next to the user roles that should have unrestricted access to your content and bypass the paywall. It’s common practice to keep “Administrator” checked, allowing admins to preview and edit content freely. You might also grant access to “Editor” or “Author” roles if team members need to review content.
Note: Selected user roles will bypass the paywall without payment.
Step 2: Review Security Tips
Below the user roles, the “Security Tips” section provides essential security reminders:
- Always use SSL/HTTPS for your website when processing payments to protect customer data.
- Keep your M-Pesa API credentials secure and never share them.
- Regularly update WordPress and the MpesaPaywallPro plugin to apply security patches.
- Monitor transaction logs for any suspicious activity.
Ensuring your website has an SSL certificate installed before accepting payments is crucial.
Step 3: Save Access Control Settings
Click the blue “Save Changes” button at the bottom of the page to save your access control settings.
With the Plugin coPlugined, you can now protect your content either manually on a per-post basis or automatically for all new posts (if you enabled the automatic paywall setting).
Manual Paywall Setup (Per-Post)
Follow these steps to protect individual posts:
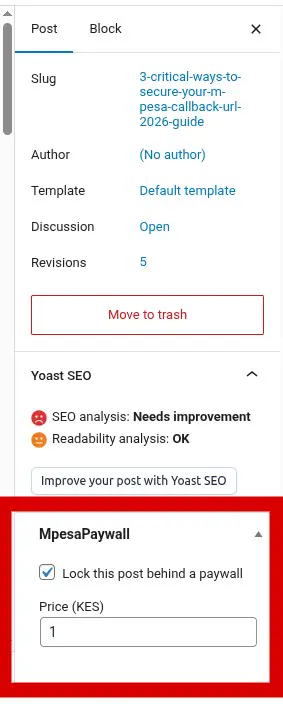
- Create or Edit a Post. Navigate to “Posts” in your WordPress sidebar. Create a new post or select an existing post to protect
- Locate the MpesaPaywall Settings Box. Within the post editor, find the “MpesaPaywall” settings box. This is typically located in the right-hand sidebar, but may appear at the bottom of the page depending on your WordPress theme and setup.
- Enable the Paywall. Check the “Lock this post behind a paywall” box to activate the paywall for the current post.
- Set a Custom Price (Optional). Below the checkbox, you’ll see a field labeled “Price (KES)”; this field lets you set a custom price for this post, overriding the default price set in the global settings. For example, you might charge 50 KES for a premium article while your standard articles cost 20 KES.
- Click the “Publish” button (for new posts) or the “Update” button (for existing posts) to save your changes and activate the paywall.
Your Readers experience
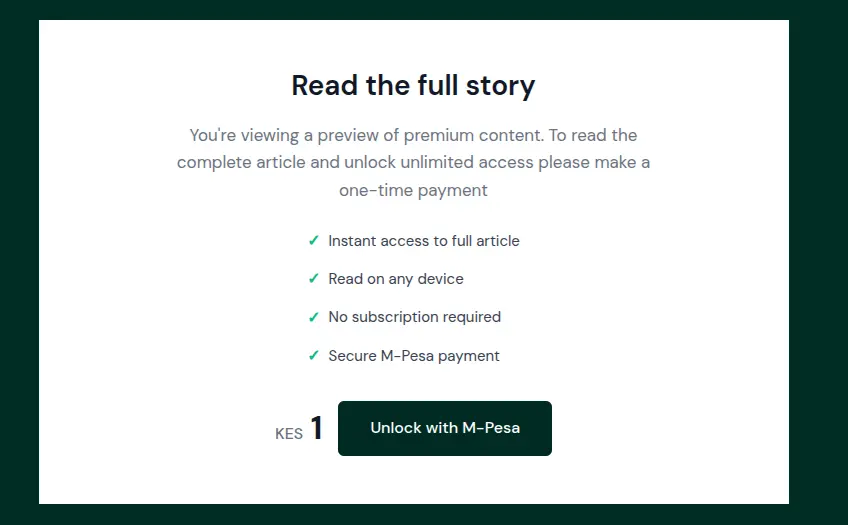
When a visitor lands on your paywalled article, they’ll initially see the title and a preview of the content. The length of this preview is determined by the “Free Content Length” setting (e.g., 100 words, as in our example).
Paywall Display:
After the free preview, your custom paywall message appears. For instance, it might say: “You’re viewing a preview of premium content. To read the complete article and unlock unlimited access, please make a one-time payment.”
Beneath this message, a prominent button in your chosen color will prompt the user to take action, with text such as “Unlock Content” or “Pay to Read More.”
Unlocking Content:
Upon clicking the unlock button, the visitor is prompted to enter their M-Pesa phone number. The system then displays the payment amount required (e.g., “20 KES”).
M-Pesa Payment:
After submitting their M-Pesa registered phone number, the visitor receives an M-Pesa STK push notification on their phone. They enter their M-Pesa PIN to authorize the payment.
Instant Access Granted:
Once the payment is confirmed (typically within 5-10 seconds), the page automatically refreshes, granting the visitor unrestricted access to the full article for the specified duration (e.g., 30 days).
Returning Visitors:
If the same visitor returns to the article within the access period, the paywall will not be displayed. The system recognizes their previous payment and grants immediate access.
Monitoring Your Plugin
Verify Plugin Activation
To confirm MpesaPaywallPro is active, navigate to the “Plugins” section in your WordPress sidebar and select “Installed Plugins.” MpesaPaywallPro should appear in the list. An active plugin is typically highlighted.
Review Notices and Warnings
Be sure to check for
warning messages, often displayed with a red or orange background, on the Plugins page. These notices provide important information.
For example, a message like “License key is missing. Add your license key to enable updates and support” indicates that you need to enter your license key in the Paywall Settings to enable automatic updates.
Keep Plugin Up-to-Date
When an update is available, an “Update available” notice will appear next to the Plugin. CPluginUpdate now” to install the latest version, which includes new features and security enhancements. Regularly updating your Plugin is important for security and ensuring compatibility with the latest version of WordPress.
Best Practices for Success
Pricing:
- Set Reasonable Prices: Start with a low price point (e.g., 20-50 KES) to encourage initial adoption. You can adjust pricing later based on performance data. Avoid pricing content too high initially.
- Vary Your Pricing: Don’t use a one-size-fits-all approach. Charge more (50-100 KES) for premium, in-depth guides and less (10-20 KES) for shorter news articles. Utilize the custom price field for individual posts to experiment.
Content Presentation:
- Optimize Preview Length: The “Free Content Length” is critical. A preview that’s too short (e.g., 50 words) won’t give readers enough information to make a decision. A preview that’s too long (e.g., 500 words) might remove the incentive to pay. Aim for a sweet spot of 100-200 words.
- Write Compelling Paywall Messages: Treat your paywall message as a sales pitch. Instead of a generic “pay to read more,” clearly explain the value: “Unlock this complete guide with 10 actionable strategies to grow your business” or “Get instant access to our exclusive research and expert analysis.”
- Provide Value: Only paywall your best, most valuable content. Paywalling everything, including thin or low-quality articles, erodes user trust and reduces payments.
- Mix Free and Paid Content: Don’t put everything behind a paywall. Offer some content for free to attract new visitors and build trust. Reserve the paywall for your most valuable content.
User Experience:
- Be Transparent: Clearly communicate what users are paying for and how long they’ll have access. Surprises lead to frustrated customers and refund requests.
- Consider Access Duration: While the 30-day default is suitable for many cases, tailor it to the content. Timely news might warrant shorter access (7-14 days), while evergreen guides and tutorials might deserve longer access (60-90 days) or even lifetime access.
- Page Loading Speed: Don’t let slow loading times kill your mobile traffic. 53% of mobile visitors abandon a site if it takes more than 3 seconds to load. Optimizing load speed is essential for keeping readers engaged, improving SEO, building trust, and converting more visitors into leads or customers. Here’s my blog post on optimizing page load speed.
Testing and Security:
- Test Before Going Live: Always test using Sandbox credentials first. Make a test payment to yourself to ensure a smooth user experience. Only switch to Production when you’re confident everything works correctly.
- Secure Your Site: Always use HTTPS (with an SSL certificate). Never share your M-Pesa API credentials. Change your credentials immediately if you suspect a compromise.
Data and Marketing:
- Promote Paywalled Content: Highlight valuable paywalled articles on social media, in your newsletter, and on your homepage to increase visibility and drive conversions.
- Build an Email List: Collect email addresses (with permission) from users who purchase your content. These engaged users are potential customers for other products or services.
Congratulations!
You’ve successfully installed MpesaPaywallPro on your WordPress site. You now have a powerful monetization system that enables you to:
- Accept M-Pesa payments directly on your website.
- Protect your premium content with a paywall.
- Automatically grant access to paying customers.
- Control paywall bypass permissions.
- Customize the paywall’s appearance.
- Set flexible pricing and access durations.
Remember, the key to a successful paywall is providing valuable content that your audience is willing to pay for. By creating high-quality, useful content, you can establish a sustainable income stream for your website.
If you encounter any issues or have questions, please refer to the troubleshooting section of this guide. You can also contact our support team by clicking the “Contact us for custom plugin” button in the MpesaPaywallPro settings.
Thank you for choosing MpesaPaywallPro. We wish you success in monetizing your content!
